reflections on the 100 day project 2017

 
FullSizeRender.jpg
 

This year's 100 Day Project wrapped up this month and I'm very grateful that I could participate again* on Instagram with #100daysoftokodotslettering.  I was inspired by a calligraphy book that had been collecting dust since my birthday in 2016, despite my best intentions.  Signing on for another project was just the motivation I needed to jump in and see where it took me over the course of the three-month project.

 
IMG_6833.JPG
 

I thought I would work my way through the calligraphy tasks with brush pens as a bit of a shortcut, as I had visions of spilled ink and big messes trying to do anything more involved with my two-year-old around. But what started as a small plan grew exponentially over time, and I found myself enjoying pointed pen calligraphy and working with a paintbrush much more than using brush pens.  Quickly I found myself rearranging my priorities to make space to explore new inks, watercolors, pens, and brushes.  I ended up spending much longer on it each day than I had planned to, but it was a welcome change from my normal routine. Of the many lessons learned over this 100 days, the quote from Annie Dillard (at the top of this post) rang most true.  I became acutely aware of how much free time I could have to dedicate to something like this when I just set aside my phone and stayed mindful of how I spend my time.  I would much rather spend my days working on fun projects like this and surrounding myself with colorful work than spend them rushing around to catch up on unfinished household tasks or print cards last-minute for a Tokodots pop-up shop.  

IMG_6932.JPG
IMG_6933.JPG

To celebrate my completion of the project, I took two of my favorite projects from the earlier days and reworked them with my new watercolors to hang as a reminder to myself in my new work space. Despite my resolve to keep up my newfound daily creative habit, life has already crept in and my paints are dry. Maybe I need to hang them in the kitchen instead! But I am doing my best to find the time for lettering and trying other new things in my watercolor sketchbook each week. The two prints pictured above are available as 8x10 giclee prints by special order ($18 each or both for $30) through my Etsy shop. Contact me for more details if you're interested.

*Check out last year's crochet project here.  

The Most Wonderful Time of the Year - travel tips

IMG_1475.JPG

Doesn't everyone love air travel at the holidays? Since having a baby a year and a half ago, I've done my fair share of airplane travel and have had a lot of friends ask for my advice.  Read on if you’re interested in learning what has worked for us.  Traveling with a baby or toddler takes a lot more preparation and energy than traveling alone, but it is actually a lot of fun.  Whether you enjoy traveling or not, pointing out all the new things at the airport and watching your little one take it in for the first time is great!  Just leave yourself extra time at the airport so you can go at a toddler’s pace and enjoy it.

Choosing your gear

Each time I’ve traveled, I’ve brought a different configuration of bags and baby gear, really depending on what T was up to at that stage in his life and where we were going.  It seems that most major airlines let you have a carry-on, personal item AND diaper bag on the plane (if you dare) and will usually let you gate-check a compact stroller and car seat as well (check with your airline in advance to be sure of size/measurements).  I have always brought a car seat with us when we traveled (Chicco KeyFit when he was small enough and a Cosco Scenera, our lightweight travel seat, once he got bigger).  The KeyFit snapped into our stroller so it was a no-brainer, but even the bigger convertible car seat fits nicely in the seat of our stroller (the Chicco Liteway Plus).  See my photo above—I use a luggage strap to fix the larger carseat onto the stroller so it can’t be accidentally pulled off by little hands.  I put my carry-on bag in the seat when I’m pushing it around the airport, but just remember that it is not safe to let your little one ride this way.  

When T was 6 months and we traveled to Europe, I took him in a baby carrier on the airplane, gate checked his carseat and stroller, and had two carry-on bags.  One to keep at my feet with all the things I needed during the flight, and one with extra items that I thought I might need (extra changes of clothes for him and for me, blankets, extra toys, snacks, etc).  It sounds like a lot, but we had three flights and I wanted to be prepared for spending long hours delayed in an airport, just in case.

Now that he is bigger and heavier, I will only take one carry-on on the airplane if I am traveling alone (a lightweight backpack so both hands are free for carrying a very squirmy guy).  But if it were a particularly long flight, a carry-on suitcase on spinners with a smaller bag affixed to the top of the suitcase would work too.  If you are trying to pack food and diapers for a 12+ hour journey plus extra for potential delays, it is definitely easier to roll a heavy bag around than to haul it around on your shoulder while you’re running around the airport. One advantage of a rolling suitcase is that T now enjoys helping to push it around the airport too, and you can usually find a flight attendant or a friendly passenger to help you get it into the overhead compartment if you have your hands full.

IMG_1454.JPG

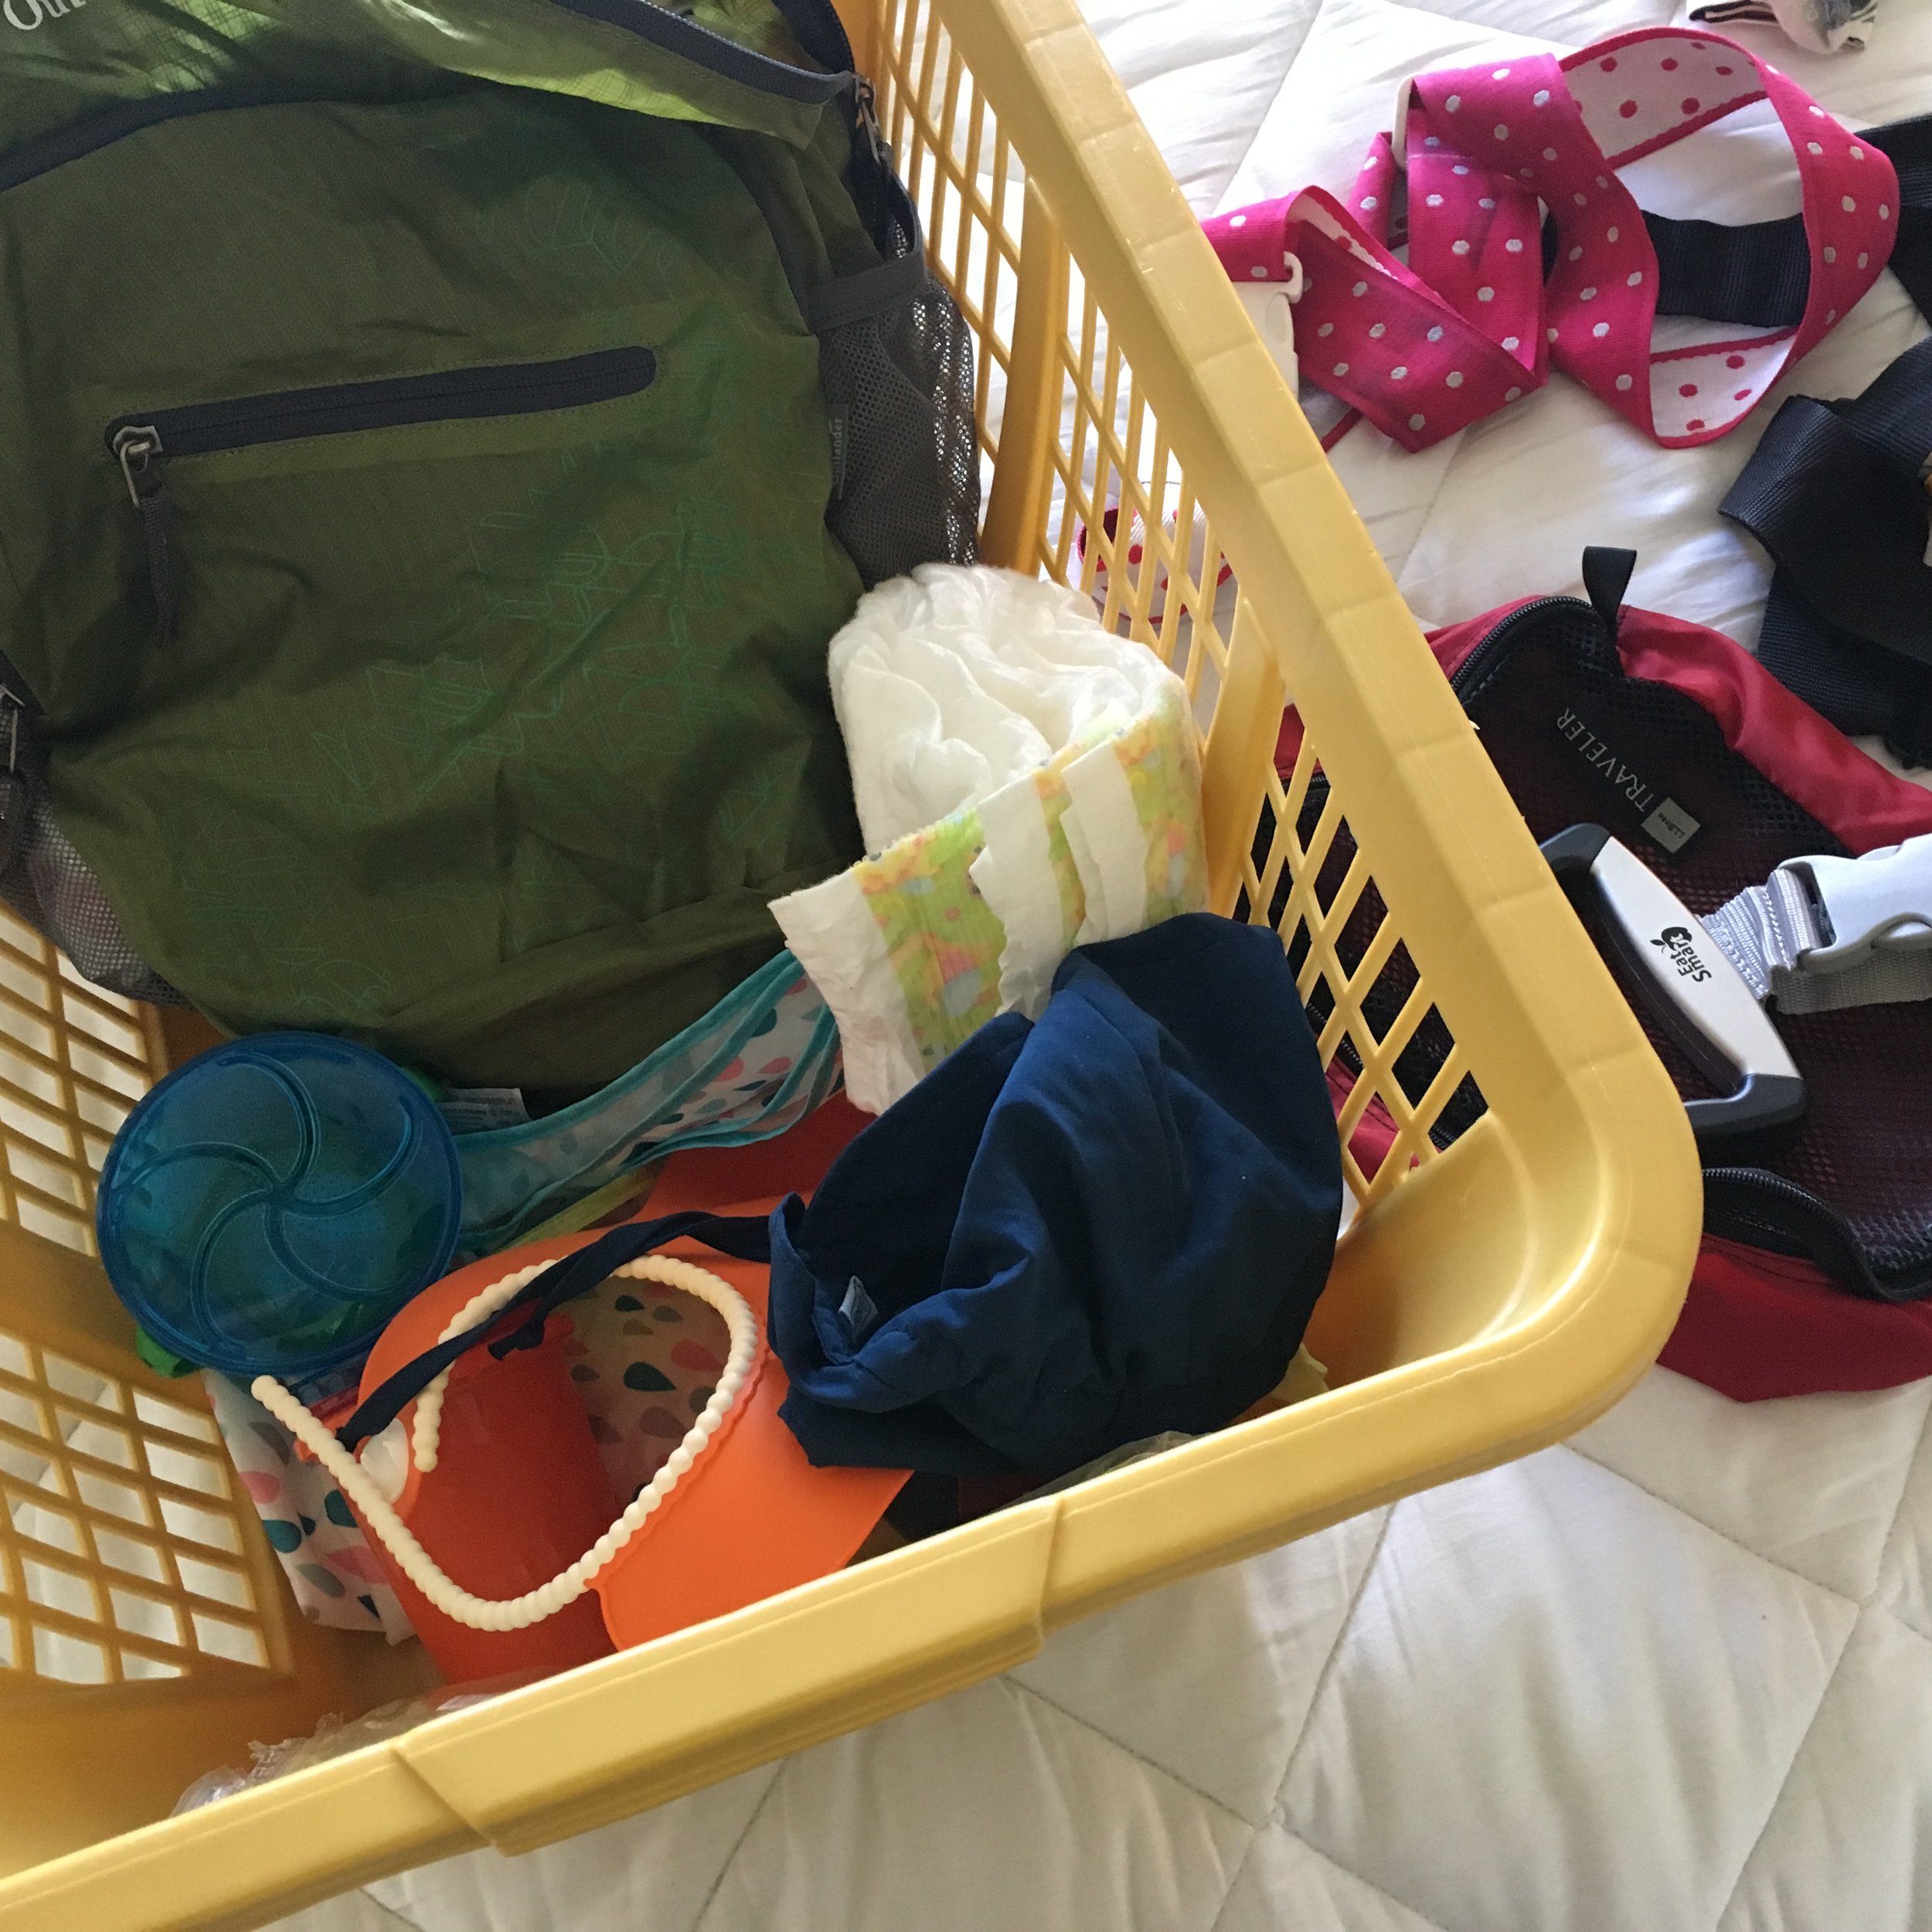
Using a laundry basket to pack

Long before I leave on our trip, I start to make a list of the things I will need to pack as I mentally go through our daily routines, and when it gets to be the last day or two before the trip, I pull out a laundry basket that I carry around the house and fill it up as much as I can before packing.  If I put a suitcase out too soon before leaving, T will do anything to get his hands on it and everything inside, but a laundry basket on the bed or counter doesn’t draw a single glance.

Pouches, pouches, pouches!

I’ve found that it’s worth organizing my carry-on bag so that it’s easiest for me to maneuver through security and the flight.  I compartmentalize most things into pouches 1) regular travel liquids (lotion, chapstick, hand sanitizer, etc.), 2) meal items (bibs, utensils, wipes, bottles/sippy cups if necessary), 3) kid toys/entertainment, 4) kid snacks, 5) spare clothes… and whatever other items you’re planning to bring on the plane.  This helps so that if your curious little one gets a look inside your bag they don’t see the treasure trove of applesauce and shiny new toys that you’ve packed for them, and just a bunch of zippered pouches instead.

I also like to have one flat pouch that I can slip into the seatback pocket the moment I get on the airplane in case I don’t have a free moment during the flight to reach into my bag.  I usually put my phone, wet ones (for wiping down parts of the seat/tray when T was in a lick-everything phase), a granola bar or snack for me, a pen, and anything else I might want during the flight.  This is less important if your little one has their own seat, but very helpful if they’re just sitting on your lap and you want to be able to grab your phone or a kindle while they’re snoozing in your arms.

Keeping them entertained

I try to find a variety of small, lightweight items to bring on the plane, some that are slightly more advanced than what he’s playing with at home.  These items have been a hit on the airplane for him at various ages: 

  • Slinky jr.
  • Retractable fabric measuring tape
  • Lacing card (like these)
  • Indestructibles baby word books like Baby Babble or Baby Night Night (Just be aware that many in this series don't have words. We prefer the ones that do!)
  • Small cars or trucks
  • Real metal keys
  • Short videos of his friends and family that we preloaded onto our phones


Food and drink

Check with the TSA website, but you should be able to bring as much liquid for your baby to drink/eat as they need, regardless of other travel restrictions.  I put all of this into one small paper shopping bag so that it is easy to pull out and show at security, although I have never been asked to.  Beyond that, I split the food into smaller paper bags as well (4 pouches of applesauce and a pouch of fruit snacks to a lunch bag, for example), so that I can just pull one smaller packet out when T needs something to eat and not let him see the whole selection of what we have for the trip.  This may not be an issue for most kids, but T is the type to see it all and then WANT IT ALL and that is just not a situation that I want to address in front of everyone at the airport or on the plane.

If you are looking for snacks or treats for your little one too, T would heartily recommend Plum Organics Teensy Fruits.  They are tiny fruit snacks made for little ones that, while expensive, have been gold for us when we travel.  I just recommend doling them out one at a time.  I let T hold the whole pack once and he was done in seconds, whereas passing them to him one by one gives us at least 5-10 minutes of contemplative snack time and usually a refreshed mood when they’re done.

Bringing a carseat on the airplane

T has always been a lap child, so I usually check in in person to ask if there are any extra seats and if one can be allocated next to me.  Sometimes this can be arranged at check-in, but you can check with the gate agent too.  If there’s no hope of an extra seat, I check T’s car seat here so I don’t have to carry it around the airport.  But if there’s a chance we’ll have an extra seat, I always try to bring the carseat on the airplane to strap him in next to me.  This may or may not work for every baby—T doesn’t mind riding in the car and this has been easier for me than trying to wrestle him in my arms for the whole flight.  You know what’s right for you.  

Asking for help when you’re traveling alone

In my experience, people want to help you if they see you traveling alone with a baby.  TSA agents may automatically help you load things onto the conveyor belt at security but if not, just ask. When you get to your gate, look for someone with a friendly face who might be the right age to have a grandchild around your son or daughter’s age.  Strangers like this are lifesavers that will smile and talk to your little one while you reorganize your bag or text your husband to let him know that you arrived at your gate.  

Don’t let the turkeys get you down

Most importantly, don’t let a jerk ruin your trip.  If you are unlucky enough to run across a Grinch who makes a rude comment or gives you a dirty look because your toddler is crying about his seat belt or screaming his head off for hours during a long-haul flight, just know that we’ve all been there.  I have at least!  Just think about all the good you are doing your little person by teaching them to get out there and see the world outside their neighborhood.  It helps to remember what you’re going to do when you get to your destination.  I’ll have a glass (or 20) of egg nog with my feet up in just a few weeks.  How about you? 

Shop update - quilt prints

I've been surprised at how much time I actually do have to knit, sew, cook and clean with a baby in tow, but the one thing I can't really do when he's not sleeping is work at a computer.  He's watched me so intensely even from a small age that I haven't been able to justify setting the example for him that sitting in front of a computer for long stretches is ok.  Showing him how to sew, making dinner, talking about the difference between knit and purl stitches, washing dishes.. these are all skills I don't mind getting him used to early, so I do still get a lot done offline!

This is why it feels like a particular accomplishment to finally get a new product into my Etsy shop. I'm excited to finally offer quilt prints!  

(For 10% off your order through Friday 11/20, use coupon code JINGLEBASH). 

Baby Quilts

Ever since finding out we were having a baby, I debated about what kind of quilt to make.  I'd whipped up several fun baby quilts for friends in the past, but this is a quilt I would be living with for a long time, so it was harder to come up with a plan.  As we decided not to find out if we were having a boy or a girl, I wasted even more time trying to find an appropriately unisex design.  In the end I settled on a simple, colorful design using some favorite Japanese fabrics I had been saving and some new additions as well. I loved it!... until I didn't anymore.

The problem arose only when I started collecting fabrics for a dear friend who is also expecting this summer. As I pulled together fabrics that were very *her,* I started to like the new fabrics and quilt design even better (zig-zags inspired by Sujata's book--a must read if you want easy quilt inspiration)! Could I really give away this beautiful quilt? I asked myself, how many quilts does one baby really need? I couldn't really keep both especially knowing that he probably has another on the way from Nana soon too.

In the end, the first quilt was finished on my due date, and surprise, it was a boy!  (Although Teddy wasn't born until 12 days later).   Once I met him, it was clear that the first quilt was perfect for him.  Mother's intuition, perhaps?  I finished up the binding on the zigzag quilt as Teddy napped. As much as I loved the second quilt, it gave me more joy to package it up and send it off to my good friend and Teddy's new friend, arriving soon. 

Teddy's quilt was my first large-scale machine quilting project on my small Janome and it worked out well enough that I went for zigzag quilting on the second one.  All in all, it was easier than I expected and a lot of fun to whip these up so quickly.  I might be going back to knitted baby blankets for a while but as soon as we get on a regular napping schedule here, I am pulling out the machine again.  In the meantime, I'll be busy deciding what to make next.

Tying up loose ends

I don't know why, but I'm always moving FOs from place to place in my apartment with the tails hanging for ages before I ever get around to weaving in the last ends and blocking.  I used to blame limited space and humid weather in my apartment in Japan but I don't have that for an excuse anymore.  After showing off some long finished projects to my mom in March, I finally bit the bullet and got pinning.  Who knew how easy it could be with a spacious guest room and a dry climate!  I forgot how much better these lace projects look after blocking!  Hopefully this is the end of piling finished projects on the back of the couch for so long that I forget they are even there.

Finished Echo Flower Shawl 

Finished Echo Flower Shawl 

Finished Baby Umaro blanket

Finished Baby Umaro blanket

All other project details can be found on Ravelry

New Projects for the New Year

image.jpg
image.jpg

We're only halfway through January but I'm making good on my goal to get new projects started beyond the thinking/planning phase while I still have my new year momentum going strong.  I happily repurposed the Debbie Bliss Cashmerino from a failed vest knitting attempt and am now working away on a new Umaro blanket that will hopefully be large enough to add to my baby gift stash.  I'm also trying to get in the habit of using my sewing machine (and growing fabric stash) more regularly.  I don't have a sewing room and having all my supplies packed away in the guest room closet has always made it a bit of a chore to get everything out and then put it all away before dinner.  But not this year!  Have you heard of the Scrappy Log Cabin Quilt-a-long on Instagram?  I'm using it to dig into my many bags of scraps and work on a mini quilt that's been on my mind for a while.  It's been great motivation, thanks Ginny! 

One other new project was updating my blog comments to a new system this week.  Hopefully this will make it easier for commenters to leave a quick note and also for me to have an email address from commenters that I can actually reply to.  I'm looking forward to hearing from you!

What have you been working on this year?


Before and After: Pincushion makeover

I've been using the cheap felt pincushion on the left for almost ten years, when I bought it thinking it would hold me over until I could make something better.  Years and years later, I am so sick of using that thing!  I've been constantly reminded of how much I dislike it while doing lots of handwork for the Trip Around the World Challenge, and despite falling a bit behind on the challenge, I just had to whip out a new one before I could sew another stitch.

I'm quite pleased with the way the chevron pattern worked out, and hey! now I can use those colorful straight pins I had been saving for no good reason.  This weekend it's down to work!

My Trip Around the World Challenge

I was talking with my mom a few weeks ago when she told me about

Brigitte Giblin

's Trip Around the World Challenge Facebook group.  Although I do have a few projects in progress, I'm always keen to start something new and this challenge gives me enough external motivation to stick with it.  We hung up the phone and I was already pulling fabrics out of my stash.  Despite bringing quite a lot of fabric back from Japan, I have a lot of small quantities so it wasn't easy to decide what to use.  I spread out all of my favorites and played around with them for hours.  I was about to give up when I decided just to take the top fabrics off the pile.  

I wasn't convinced that I had picked the best fabrics but I am enjoying how they all come together.  The piece grew steadily at first and after finishing row 5, I was on a roll!  As I have gotten further through the rounds though, I've gotten busier and seem to have less and less time to dedicate to my project each evening.

I've got 8 rows down now and I'm just itching to pick out the fabrics for the next assignment, rows 10-18.  We have a bit less time to finish these first assignments than I was counting on, but I'm still optimistic. It's obviously called a challenge for a reason.

Bitterroot

I started

Bitterroot

a few weeks ago when I was in need of a new lace project.  I've been picking up and putting down my granny square project for years now, but it can't seem to keep my interest beyond a few squares.  This is the perfect lace project to keep my attention, and started with some yarn from my stash, too.  I was about to post how this is my favorite part of a triangular shawl project.  Just far enough in that I have memorized the lace pattern, but not so close to the end that the rows are pushing 300 stitches. 

You might notice that there are no needles in this photo though.  Even worse than interminable rows at the end of these projects are those moments when you realize you messed up some increases a while back.  At least I found it before making it much further!  I spent a bit of this rainy afternoon carefully making my way back to the problem area, and now I'm all set to enjoy the project again.  The details are on

Ravelry

.